
What are sets?
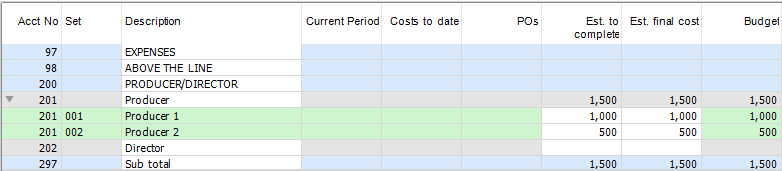
Sets in Moneypenny are an additional level of detail to manage your costs. Sets can be enabled per account code or globally and once enabled will be an additional column in all data entry screens and visible from your Cost Manager and Cost Report underneath the main account code.
Setting up sets
There are three ways to create sets.
- Go to ‘Setup > Sets’.
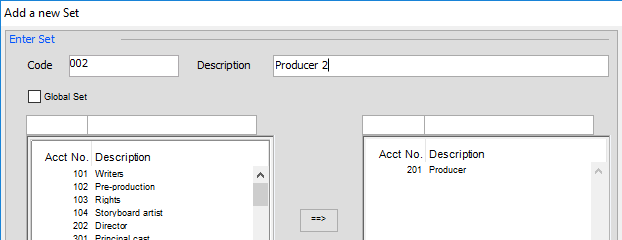
- Select ‘New’ at the bottom.
- Enter the Set Code and description. Select the account you wish to activate the set on, and press the ==> arrow to move it into the right-hand side. If this set should apply to all accounts instead, tick ‘Global Set’.
- Click ‘Save’.
Note all sets created this way will be inactive. They will still be usable in entry screens but will not appear on the Cost Manager until activated. To learn more see the next section about activating a set.
You can download a copy of our Set Import Template here.
- Download the set template above and fill in
- Set Number (Alphanumeric, 7 digits).
- Description
- Account Number.
- If your project has Locations, fill this in otherwise leave blank.
If the project is using Locations you must add the Location in the set up menu, then activate the Location in the Cost Manager BEFORE you can import sets. You cannot add a Set to a Location that doesn’t exist and that has not been activated.
-
-
- To activate the set at time of entry so that it is visible in the Cost Manager please put ‘Y’ in the final column, otherwise leave the column blank.
-
- Go to ‘Setup > Sets’.
- At the bottom, select ‘Copy Set from Excel’.
- In the Excel sheet, highlight the data (From Set No to Activate) excluding the headers and copy.
- Go back into the system and click ‘Paste from Excel. You should see your data in the correct columns, if not you can drag and drop the columns to match the order (Set Code, Description, Acct No, Location, Activate?).
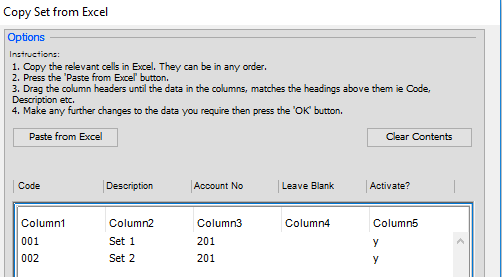
- Hit OK to import.
If you cannot view the above video, you can watch it at Youtube at the following location.
– https://www.youtube.com/watch?v=HQ4hFNIEkew
- Go into the Cost Manager (‘General Ledger > Cost Manager’) and hit OK on your selection.
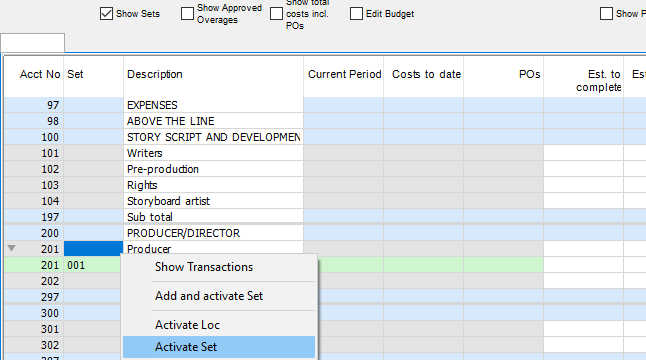
- Tick ‘Show Sets’ in the top-left.
- Go to the account you wish to create the set. Right-click the account (gray) line and select ‘Add and activate set’.
- Enter the set code and description, then hit Save.
My sets aren’t showing in my Cost Manager?
By default, sets created manually or imported are inactive until either:
- They are activated from the Cost Manager
- A transaction is posted against the set
To activate an inactive set, go into the Cost Manager and ensure ‘Show Sets’ is ticked in the top-left of the screen. Then right-click on the account in question and select ‘Activate Set’. This will bring up a list of all sets under that account code or global sets to activate.
Rename a set
If your set has the wrong description, you can change it by either:
- Go to ‘Setup > Sets’, double-click the set and change the description
- Go into the Cost Manager, find the set in question and type over the description
Delete a set
You can only delete inactive sets. If your set is active (visible in the Cost Manager), you must first go into the Cost Manager, right-click the set and select ‘Deactivate Set’ to remove it. If anything is posted against this set, you will need to use Distribution Change to move any items first.
Once deactivated, you can go into ‘Setup > Sets’, select the set and click ‘Delete’